

How to tie Fluorocarbon to Braided Line
What's up angling world! Today, I am going to teach you how to tie fluorocarbon to braided line. In my opinion, the simplest and quickest way to tie fluorocarbon leader to braided line is via the uni to uni knot. The uni to uni knot is one of the easiest and most effective knots to tie, and I highly recommend you add this knot to your knot-tying arsenal.
Before we dive into HOW to tie fluorocarbon leader to braided line, I think it is EXTREMELY important that you are choosing the RIGHT size fluorocarbon to tie to your braided line. This particular subject will require a more in-depth look in a future article, but this is an easy principle to follow for choosing the right size fluorocarbon leader to tie to your braided line:
When choosing your fluorocarbon leader, choose leader ONE to TWO times the breaking strength of your braided line.
This means if you are using 10# braided fishing line, you should choose fluoro anywhere from 10# to 20# breaking strength. The reason being is that you do not want the diameter of your fluorocarbon leader to be too much thicker than your braided fishing line. The thicker the fluoro is compared to your braid, the more likely the knot (on the braided line side) will slip through your fluoro knot while fighting a fish.

In addition, in 99% of situations it DOES NOT make sense to have a braided line that breaks at 10# while using a fluoro leader that breaks at a much higher breaking strength, say 30#. When approximately 10 pounds of pressure is applied to your line/knot, the 10# braided line will break first every time thus negating the increased breaking strength of your fluorocarbon leader (which is more expensive than lighter lbs test fluoro by the way).
IF you need to increase the size of your fluoro to avoid breaking off on structure, I highly recommend increasing the size of your braided line to match the size of your fluoro. Not only will you avoid breaking off on the structure, but you will also be able to apply more pressure to the fish to pull it away from said structure. If you feel you will need 30# fluoro fishing for Snook around docks, then I would bump up to 15# or 20# braided line.
I want to point out that this isn't the rule, but this is a simple principle to follow to help avoid headaches and ultimately catch more fish.
Helpful Tip: If you want to have multiple sizes of braided line available but cannot afford multiple rod and reel set ups, you can purchase an extra spool or two (generally for around $25 to $50 depending on the reel). This will allow you to upgrade to a higher breaking strength braided line while out on the water without having to carry multiple rod and reel set ups. All you have to do is switch out spools on your reel, which I can expand upon more in a future article and video. In addition, having extra spools while fishing from shore is particularly helpful since it is more difficult to keep multiple rod and reel set ups with you while fishing from land.

Once you choose the right fluorocarbon leader, you will then proceed to tie your fluorocarbon leader to your braided fishing line by following these steps:
- Pinch your fluorocarbon and braid between your index finger and thumb.

You'll want to start in this position so that you can keep your other hand free to tie your uni knots. When in this position, be sure that the lines are parallel to each other (one on top of the other). I prefer to start with tying my braided line first since it is generally a smaller diameter and is easier to tie. As a result, I start with the braided line on top like the picture above.
- Make a loop.

Use your right hand to create a loop with your braided line, and then pinch this newly created loop between your left thumb and pointer finger.
- Begin your first Uni Knot.
Use your free hand (in my case, my right hand) to thread the braided line through your newly created loop.
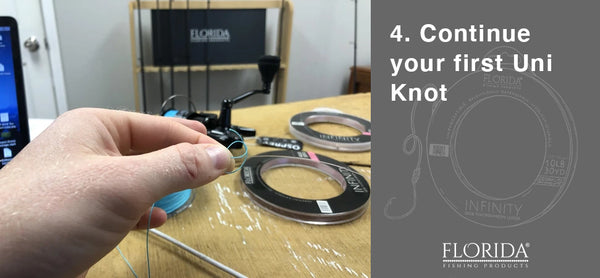
- Continue your first Uni Knot.

Wrap your braided line that you just threaded through the loop around the fluoro and braid already lying next to each other at the base of the loop. Continue threading and wrapping the braided line through. I generally recommend that you wrap the braid 5 to 8 times around depending on the braid's thickness. The thicker the braid, the LESS wraps you will make. Every time you add a wrap, you are making your knot thicker. If you use thick braid with many wraps, you will be creating a BIG knot that is unnecessary and likely will cause issues with the eyes on your rod tips.
- Finish your first Uni Knot.

Pull tight on the tag of your braid and cinch down on what will become your first completed uni knot.
- Prepare for your second Uni Knot

Flip your line so that your fluoro tag is now on top and the uni knot you just cinched down is in your left hand between your pointer finger and thumb.
- Start your second (fluoro) Uni Knot

At this point, I begin the Uni Knot process all over again on the fluorocarbon side by creating another loop.
- Continue your second Uni Knot.
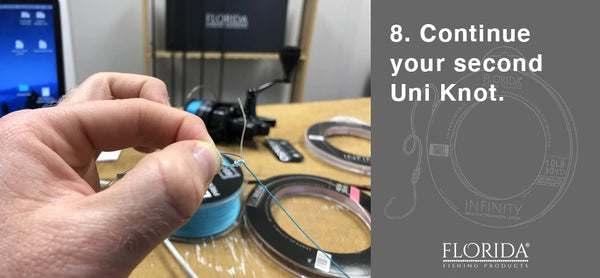
This time you will thread your fluoro tag through the loop and wrap it around the fluoro and braid pinched between your fingers. Due to the thicker diameter of the fluoro leader, you do not need to wrap it as many times as the braided line. Generally, I wrap the fluoro 3 to 5 times depending on the diameter of the fluoro.
- Cinch down on your second Uni Knot.

Take note, the fluoro knot WILL NOT cinch down as easily as the braided line knot. Don't worry, the fluoro side of the uni knot will cinch down more once you get to Step # 11.
- At this point, if you have done this all correctly, you will have two separate but complete unit knots.

- Tighten your two Uni Knots together.

Personally, I prefer wetting my lines in my mouth before tightening them together. I find that is helps the knots cinch down together better. However, I was recently told that wetting your knots can actually weaken them. This will be something that I will have to test out in the future.
When tightening the two uni knots together, I like to wrap the braid around one hand and tightly hold the fluoro in the other hand. Wrapping the braided line around your hand gives you a better grip and helps you cinch the knots together better. DO NOT wrap your fluoro in your hand. This will cause kinks in the fluoro leader that can affect the breaking strength of the fluoro and the way your lure or bait swims.
- Remove your tags.

You're almost done! However, this a CRITICAL last step. You will want to trim your tags as close to the knot as possible without cutting so close that the tags will slip through and you will end up with a dreaded Curly Q leader after losing a PB fish! I recommend testing this out a bit in the garage or at home before going out on the water. Some folks tighten knots better than others. Thus, some anglers can cut their tags shorter than others. You will just have to do some trial and error here to see what works best for you. After you trim your tags on your knots, pull the braid and fluoro away from each other to test your knot. If the knot slips, you will want to use a longer tag in the future. If you test the knot and your tag end is still a little too long, you can trim it a little further until it reaches your desired length.
That's that. Hopefully, you now know how to tie fluorocarbon to braided line via the Uni Knot. I can assure you that when done right, the Uni to Unit Knot is a FANTASTIC knot for tying your fluorocarbon leader to braided line. I have won numerous tournaments and caught many large gamefish using this very knot, and cannot say enough good things about it. I hope that you will soon come to believe the same.
Good Fishing,
- Ty Nelson